Learn how to weld thin steel so it doesn’t burn through or warp. A guide to preparation, types of welding electrode, tack and stitch techniques, heat control, backing, basic SMAW/MIG/TIG settings, and troubleshooting for workshop jobs and projects.
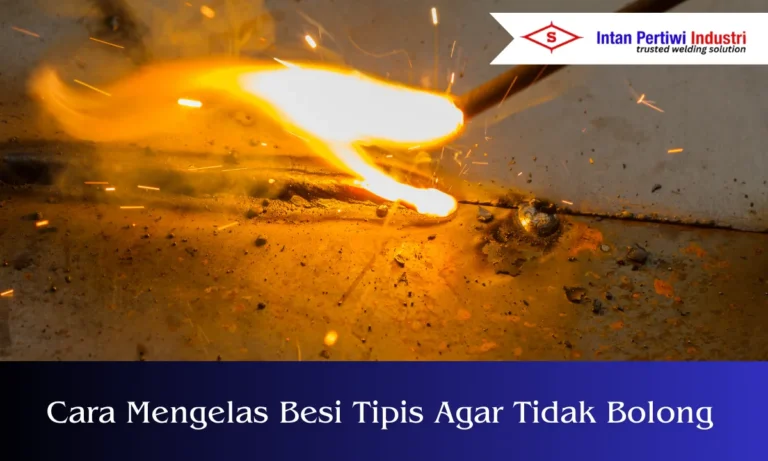
Welding thin steel is a seemingly simple task, but it often leads to rework in the workshop. Even the slightest excess heat can cause the material to puncture.
If the welding sequence is incorrect, the frame can twist and its dimensions can change. Therefore, welding thin steel requires a different approach than welding thick steel.
The focus is not on achieving the length of the draw, but on maintaining heat control, keeping the joints tight, and distributing the heat evenly.
This article is written for the needs of beginner to intermediate readers such as workshop technicians, maintenance teams, vocational students, and light fabrication practitioners who want neat and consistent results.
Table of Contents
ToggleWhy Does Thin Iron Easily Form Holes When Welding?
Holes or penetrations generally occur because heat builds up faster than the material's ability to withstand the weld pool. There are four main causes.
- Heat input too high
Heat input is affected by current, voltage, and how long you hold the arc on one point. On thin steel, the tolerances are narrow. - The joint gap is too large
A wide gap makes it easy for the molten metal to fall and form a hole. An uneven gap also results in inconsistent results. - Movement speed too slow
When you move slowly, heat builds up. This increases the risk of burn-through and worsens distortion. - Incorrect arc and angle control
An arc length that is too long and an incorrect angle can cause uncontrolled penetration or widen the hot area.
Preparation Before Welding Thin Iron
Preparation determines productivity and quality stability. For thin materials, preparation is often more important than increasing machine settings.
Make sure the material type and thickness
Know whether you're welding thin plate, thin hollow, or thin pipe. Thinner materials require tighter heat distribution and tighter tack spacing.
If the material has a paint, rust, or galvanized coating, clean the joint area to reduce porosity and arc instability.
Clean the surface until the metal is clean.
Clean rust, paint, oil, and minimal dust from the area to be welded. Dirty surfaces often cause porosity and excessive spatter.
For production, cleanliness also makes the arc more stable and results more uniform between operators.
Adjust the fit up tightly and the gaps evenly.
The best goal for thin metal is a tight joint. If gaps are unavoidable, keep them as small and uniform as possible. A variable gap makes it difficult to maintain the weld pool's shape.
Use clamps and jigs
Thin steel deforms easily when heated. Clamps and jigs help maintain alignment and reduce distortion. Ensure clamping is close to the joint, especially on hollow frames.
Prepare the backing and heat sink if necessary
The backing helps contain the weld pool and absorb heat. Copper and aluminum are often used because of their high thermal conductivity.
In workshop practice, backing is an effective solution when the thickness is very thin or the butt joint has gaps that are difficult to seal tightly.
Choose the Most Suitable Welding Process for Thin Iron
The process selection will affect the ease of heat control, working speed, and appearance quality.
MIG for productivity and ease of control
MIG is often the first choice for thin metal fabrication because the process is stable, fast, and easier to learn than other processes.
Heat control is achieved through a balance of tension and wire feed speed, as well as disciplined stitching technique.
TIG for the neatest results and fine heat control
TIG is suitable for work that requires precision and a clean appearance. Heat control is more refined because the filler is added separately. The drawbacks are speed and operator skill requirements.
SMAW can be used but requires special techniques.
SMAW welding can be used for thin iron, especially if the only facilities available in the field are electric welding machines.
The challenge is maintaining a stable arc at low heat. The key is to choose a small electrode diameter and use repeated tacks, not long draws.
Safe Setting Principles for Welding Thin Iron
There's no single correct number for all machines and all conditions. However, there are principles that are always relevant to reduce the risk of holes and distortion.
Start from the lowest heat possible that is still stable
If the arc is unstable, increase it little by little until it is stable.Keep the arc short
A short arc helps direct heat in a more controlled manner and reduces the risk of overheating over a large area.Use short stitches
Thin steel is safer to weld with short stitches and pauses, rather than long pulls.Balance the welding sequence
Don't finish one long side first. Spread the heat over several points so the pull is spread evenly.
How to Weld Thin Iron So It Doesn't Get Holes
This section is a workflow that can be directly practiced in the workshop.
1. Prepare the working position and hand support
Hand stability is crucial. If the position is unstable, the operator tends to hold the bow longer to achieve the desired shape, increasing the risk of a cut. Ensure you have a clear stance and a clear view.
2. Perform tack weld as the main lock
In thin steel, tack is more than just a fastening point. It's a key strategy for controlling distortion and distributing heat.
Effective tack sequence
Make a tack at the first end
Make a tack at both ends
Make a tack in the middle
Add tack at other points until the joint is securely locked.
The thinner the material, the tighter the tack spacing required to keep the shape from changing during the filling process.
3. Use the stitch and skip technique to distribute the heat
Stitching is welding with short seams. Skipping is moving between seams to allow the newly welded area to cool down.
Examples of safe work patterns
Short weld at point A
Move to point B which is a distance away
Move to point C
Return to point A when the area is cooler.
This technique is effective for hollow, thin plates, and long joints.
4. Control heat input with arc speed and arc distance
If you start to see signs of overheating, immediately correct it using the two quickest methods the operator can use.
Speed up the movement
Shorten the arc
For MIG, keep the nozzle tip and wire distance consistent. For SMAW, keep the arc length short to prevent heat from escaping. For TIG, maintain arc control and add filler sparingly without holding it too long.
5. Use backing if the material is very thin or there are gaps.
If you notice your pool starting to sink or an area starting to weaken, backing can be a lifesaver. Secure the backing tightly behind the seam.
The backing helps absorb heat and hold the molten metal, significantly reducing the risk of penetration.
6. Visual inspection and early correction
Don't wait until you've finished one long side. Stop and check the shape, straightness, and any spots that are starting to thin or discolor excessively. Early correction is quicker and cheaper than late repairs.
Practical Techniques Based on the Most Frequently Searched Cases
How to weld thin hollow for fences and canopies
Thin hollows twist easily because their walls are thin and their shape is closed. Use the following approach.
Clamp on 2 sides to maintain the angle
Tack at 4 points on the corner joints
Make short stitches and switch sides alternately.
Avoid finishing one side before the other.
The goal is to balance the heat drag to keep the frame straight.
How to weld thin plate butt joints
Butt joints in thin plates are most prone to penetration. Safe strategies
Make sure the fit up is tight
Use backing if possible
Tack tightly along the joint
Fill the seam with short stitches and pause.
How to weld thin pipes so they don't leak
For thin pipes, cleanliness and heat control are crucial. Ensure the pipe is clean and dry.
For applications that require tight joints and minimal risk of leaks, TIG is often chosen for its more precise penetration control. Regardless of the process, avoid holding the arc at a single point.
Troubleshooting Common Problems and Solutions
Through or perforated welding
Common causes
The heat is too high
The gap is too wide
Holding the bow too long
Practical solution
Lower the heat and test on the scrap
Tighten the joints and increase the tack
Use shorter stitches and pauses
Add a backing or heat sink
If there is a hole, cover it with small pieces of tack gradually surrounding the hole, then fill it slowly.
Twisted or wavy material
Common causes
Unbalanced welding sequence
Tack is too rare
Less clamp
Practical solution
Add clamp and jig
More tack
Use a skid to prevent heat from building up in one area.
Alternate welding on opposite sides
Porosity or porous
Common causes
Dirty surface
Shielding gas is compromised in MIG or TIG
Contamination from paint or galvanizing
Practical solution
Clean the material until the metal is clean
Make sure the gas flow is stable and the area is not exposed to gusts of wind.
Check the condition of the nozzle and gas line
Make sure consumables and materials are in good condition.
Lack of fusion
This often occurs when operators lower the heat too much for fear of creating holes. The result is that the bead sticks to the surface without sufficient fusion.
Practical solution
Increase the heat gradually until the arc stabilizes and fusion occurs.
Correct the angle so that heat enters both sides of the joint.
Make sure the surface is clean and the fit is tight.
Recommended Welding Electrode for Welding Thin Iron
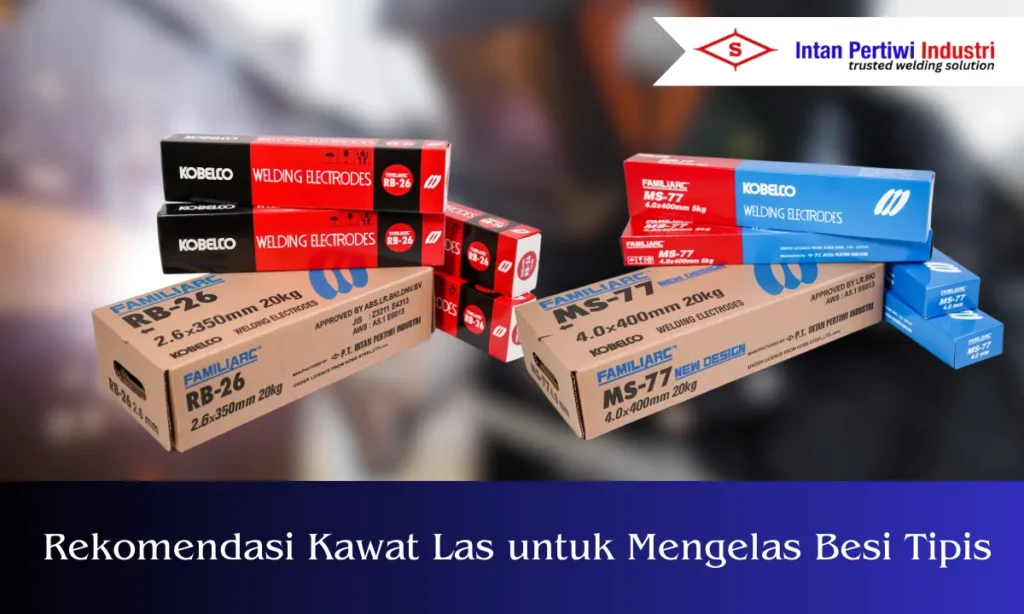
For thin iron, the priority is electrode welding electrode that produces a soft arc, is easy to ignite, slag is easy to remove, and helps the operator control the heat so that it does not easily penetrate.
Of the products available at intanpertiwi.co.id, the most relevant recommendations for SMAW-based thin-sheet metal work are RB 26 and MS 77 as both are rutile electrodes classified AWS A5.1 E6013 and are known to be easy to use for light fabrication, including thin plates if the diameter and current are set correctly.
1. KOBELCO RB-26 Welding Electrode
RB 26 is recommended when your target is light fabrication work on low carbon steel, with the need for easy ignition, more controlled sparks, and easy slag flaking.
The smooth and stable nature of the arc helps reduce the risk of heat building up in one spot, making it safer for thin materials as long as you use tack and stitch techniques and choose the appropriate diameter.
View Products : KOBELCO RB-26 Welding Electrode
2. KOBELCO MS-77 Welding Electrode
MS 77 is suitable for welding mild steel and is often chosen when you need a stable arc feel and easy slag cleaning process.
On the product page, MS 77 is also mentioned as being suitable for projects that require precision and efficiency, especially on thin plates, making it relevant for light frames, brackets, and workshop work that prioritizes a neat bead appearance.
View Product: KOBELCO MS-77 Welding Electrode
Guide to Selecting Consumables for Thin Iron
Selecting the right consumables helps ensure consistent quality and reduces variation between operators. For thin steel, arc stability and ease of heat control are key priorities.
For SMAW on thin steel
Use a smaller electrode diameter to make the heat more manageable. Follow the electrode manufacturer's current recommendations and test on similar materials before production.For MIG on thin steel
Choose a wire with good feed stability and a consistent arc. Ensure the combination of parameters provides stable transfer, controlled spatter, and a neat bead.For TIG on thin steel
Use a consistent mild steel filler and a filler addition technique that does not hold the arc in one spot for too long.
As a manufacturer and manufacturer of welding consumables and a supplier of KOBELCO products, Intan Pertiwi Industri can help you select electrodes or welding electrodes according to thickness, position, and quality targets.
For project needs, the best approach is to align consumable selection with internal procedures and product technical recommendations to ensure consistent results from start to finish.
Quick Checklist Before Starting to Welding Thin Iron
Surface clean from rust, paint and oil
Tight fit and uniform gaps
Clamp installed near the joint
Tack tightly to lock the shape
Use stitch and skip
Short arc and steady motion
Backing is prepared for very thin materials
Check the straightness regularly
Closing
Effective welding of thin metal always begins with three things: tight joint preparation, heat distribution through the tack and stitch, and disciplined arc control.
If you implement the correct work sequence and perform a short test on the scrap before starting production, the risk of holes and distortion can be drastically reduced, while increasing the consistency of results for both workshop and project needs.

FAQs on How to Weld Thin Iron
Can thin iron be welded with electricity?
Yes. The key is to choose a small electrode diameter, keep the arc short, and use tack and stitch techniques to prevent heat buildup.
Is MIG or TIG easier for thin metal?
MIG is typically faster and more productive for fabrication. TIG offers finer heat control and neater results, but requires more skill and a slower work pace.
Why is it still a hole even though it's low heat?
This is usually because the joint gap is too large, the movement speed is too slow, or you're holding the bow in one spot. Tighten the fit, increase the tack, use stitches, and add backing if necessary.
How to prevent distortion in thin hollow?
Use clamps and jigs, tight tacks, balanced welding sequences, and skip to distribute the heat.